I found this at another site and she had found it from another!

This is the site: nativity silhouette
You will need paper with substance for this project and the next one, so it may be worth purchasing a quality sketch pad. I won't get into the weight requirements or brand names. Just feel it, if you can. If it is thicker than construction paper and smoother than watercolor paper, you have a good thing! The size is up to you.
So, the materials needed for this project, are:
white sketch paper or Bristol (for next week, also)
construction paper; black and yellow
tempera or craft paint
royal blue
purple
black
white
(see picture for examples of supplies)
scissors
glue stick or the like
coated paper plate for palette or small plastic cups
thick/stiff brush
cup for water
paper towel
wide painter's tape or masking tape (painter's tape comes off easier)
white pencil
printed template (optional~you could just paint it on, but you will have to work on that yourself ) :)
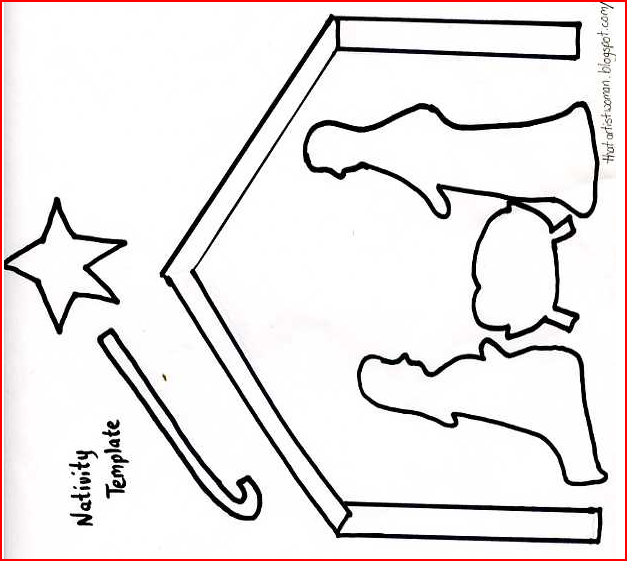
copy, paste into Word document, resize to 6" width, and print
for a 9 x 12 paper project

Begin by taping off the edges of your paper with the painter's tape.
When you are done, this will show up as a "frame", so you want to take care that the tape is equally placed from the edges, all the way around.
I penciled in a boarder first so I would have a guide to lay my tape.
Print out the template and cut to make sure the fit is right on your taped paper.
Use these cut pieces to trace onto the black and yellow construction paper and cut these out as well, to have ready for the painted paper.
I used the white pencil to trace on the black so I could see the marks.
Now you should be ready to paint.

This shows the pencil mark for even taping...tape all edges before painting.
1. Tape of the boarders
Tape it to your work area, I taped mine right to my painting surface, the familiar green place mat.
This keeps your work steady while you are painting.
2. Trace a circle
Trace a circle at center VERY LIGHTLY and just below half way down the paper. Look below at pictures for placement and size example...this one could have gone a little bit lower, but it will work.

3. Loading your palette
Now you can begin to put some of the paint on the plate or palette. Leave spaces between your colors to leave room for mixing colors.
This is just one way of doing things...you could use a cup.

4. Mixing and using the blue tint
The main thing is to use a blue tint (white added to the hue) and paint this around the blank circular space (center and just below half way down). Make circular strokes around this space going outward about 2 inches.

5. Adding more blue to the mix
Now, add a little more blue to the mix. If you don't like it, if it became too dark...start over with the mixing.
Make circular strokes outward away from the center and the first blue tint strokes.

6. Adding purple to the mix
Same as above, now add purple to the mix. Add a little at a time until you like it. Again, start on the outer edge of the painted area and work outward toward the paper edge/tape.

7. Just a tad bit of black to the mix
Now add a tiny bit of black. Maybe one more time at the very corners of the paper.
Try not to get too dark, making sure that the black construction paper is darker than the paint.
If the hill ends up the same shade as the construction paper, that is okay. Make sure your figures are right at the top of the hill so we can see them.

8. More black for a hill
Lastly for the painting, add a bit more black for the hill. Paint the hill wide enough for the stable to fit on and high enough so that the moon can be seen where you want it (I like mine in the barn, at the top). Use the pattern piece to test.

After this is done, carefully and slowly take the tape off when the paint is still wet. Pull parallel to the table (compared to pulling upward) as much as you can, this may help in not taking up the paper with it.
9. Glue on the patterns
When the paint is dry, glue the cut outs onto your paper.

I tried to download a video, but it was crazy long for processing...must figure out why another time.
If you have questions because I wasn't clear, email me and I will get back with you A.S.A.P.
You could use a silver, white or gold pen to sign your art work. I think putting a date on it is nice for future reference. You know, for when you become famous and people are buying your artwork. Or, maybe even more realistically, when you look back at things that you have done in the past to reminisce!
I suggest you do a few of these, they would make wonderful gifts!
May you enjoy this time of year, knowing the truth about Christmas and the Gift that we are given through Christ's Birth.
Happy painting!
Mrs. Hayes
No comments:
Post a Comment