Happy New Year, everyone!
It is incredible how long it seems since I have posted...almost three weeks!
I have had some time to think about this blog and other endeavors floating around in my head and have come to a conclusion (for now).
This blog will go out every other week, instead of weekly, giving me more time to work on another art project that I have wanted to complete.
Hopefully, in the near future, you will see the fruits of my labor.
Be looking for art packets to purchase that will include all the supplies and direction one should need to complete an art project.
I have lots of ideas, but since this is ground-breaking, feel free to submit your requests. Whether it is a certain artist or technique that you want to cover, I would love to hear your suggestions.
It is my plan; to offer the packets at the opening of each post and on the product page. Free lessons will continue to be offered every other week.
With so many people looking at this blog, I am hopeful that it has been an inspiration and help with art lessons. I have completely enjoyed preparing them.
My boys are not used to having art on a regular basis, I think the every other week schedule will allow them time to enjoy the projects more. Their work is quickly filling up our wall! I am very proud of what they have created...

There are even more, the fall trees are around the corner...
Project # 16
Mosaic Trivet


I forgot to take pictures of the process with this one, so there are only a few pictures! I will insert them once I do this with my boys (and if I remember to take the pictures!).
Email any questions...
Supplies:
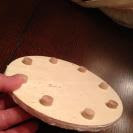
thin wooden disk, 6.5" diameter (Hobby Lobby, by the cork)
wooden plugs (Hobby Lobby-#210989) for the "feet"
ceramic tiles of various colors
tacky craft glue
plaster of paris
Bristol board cut to (2 - 5/8 x 11)
scotch tape
stapler
sponge and water
hammer
old towel
newspaper
stir stick
bucket or large bowl to mix plaster
cardboard
clear spray paint
hammer
fine sand paper
safety goggles
Students will need a place (like cement or a wooden board) outside to break up the tile.
This will take about an hour or more to finish, then overnight for drying, and a bit more time to sand (lightly), spray with clear and then allow for that to dry.
Wrap the tile in the old towel and let them smash it into pieces with the hammer (outside) on a hard surface. Don't forget the safety goggles.
Glue the plugs onto the bottom of the wooden disk.

Use the Tacky craft glue to glue the pieces of broken tile onto the top of the disk. You may want to trace the disk onto a piece of paper and arrange the pieces on this first. This way you can create a design and transfer it to the wooden disk after you like what you make.
Staple or tape the two piece of Bristol board and wrap it tightly around the edge of the wooden disk. Secure it with scotch tape. Make sure it is flush with the pegs or table. If your tile is thick, adjust this band. If you need to adjust, it is probably best to recut the Bristol pieces to the size needed. This will serve as a guide to the depth of the plaster and a mold that will form the trivet sides.
Mix the plaster as directed on package. Mine was thick, but almost pourable. Pour or scoop it into the mold (on top of the wooden disk and glued tile). Tap it and jiggle it to get any air bubble out.
Use the stir stick to level out the plaster, then use a damp sponge to clean off excess plaster from the top of the tiles. If you make dents and dips in the plaster, just add more to even out the surface. It may take some practice, but you have some time to work with the plaster before it dries.
Let it dry completely. This will take overnight. Once it is dry, you can remove the paper mold.

Sand away rough edges with the fine sand paper. Use this to sand off any haze from the top tiles. Wipe away the dust with the clean, damp sponge. Let it dry (shouldn't take long) and spray with clear spray paint.

This is a picture of the tile with a haze, before a light sanding and cleaning

I sprayed multiple layers, letting it puddle in the nooks and crannies. Don't forget to spray the bottom and the edge.
Spray outside, making sure the temperature is above 50. Let dry in the garage overnight.
Spray outside, making sure the temperature is above 50. Let dry in the garage overnight.
No comments:
Post a Comment