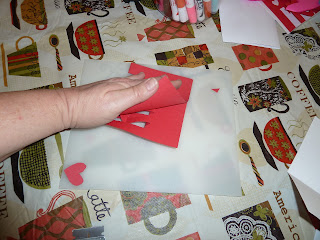
I couldn't resist, as Valentine's Day is right around the corner, sharing a couple of my favorites; this year, anyway!
The first of them is one I did when the boys where much younger, we actually did this with their Sunday School class.
I will include a picture that you should be able to copy and paste into a Word document to resize as needed, then print out to use as a template for your card making.
Card 1:
Supplies:
White and Red paper (construction or card stock are best)
glue stick
pencil and eraser
scissors
markers, stickers, glitter glue for decorating your card
With one color, trace and cut the hand out. Fold the two middle fingers down.
Use the other color as the card part. Glue the hand to the front or inside of the card.
Decorate or simply write a Valentine message. Actually, the hand speaks for itself!
If you didn't know, you made the hand-sign for "I love you", when the two middle fingers are folded down.
*the next two require an X-ACTO knife*
*use with extreme caution, or have an adult do the cutting*
Card 2:
The one we are going to make this year...
Supplies:
computer
digital camera
scissors or paper cutter
X-ACTO knife and cutting surface
lollipops, sugar straws, honey sticks, Twizzlers...
Have someone take your picture, with you holding out one hand (fisted) towards the camera, but slightly to the side. Here is an example of my sons' pics for their cards:
Use whatever software you have; I put their pictures in a Word document and arranged four pictures on a letter sized page. I also added text boxes for a Valentine's Day message.
Print out your pictures. Cut out the cards.
The next step may take an adult to help. You will use an X-ACTO knife to cut a slit above the hand and below so that the candy can fit through; see the picture below:
Insert a sugar straw, honey stick, lollipop or even a Twizzler (my favorite).
Card 3:
This one will be for older kids...
Supplies:
two contrasting sheets of card stock
pencil
scissors
markers
X-ACTO knife and cutting surface
glue stick
Cut the card stock in half (you will end up with two 8.5 x 5.5)
With one of the colors, cut them down further to measure 8 x 5.
Use this template to paste into a Word document.
Set the paper orientation to "landscape" position.
Then resize (will be stretched out) to fit half the sheet.
I had mine adjusted so that two would fit on one sheet.
The following is for those not sure how to resize an object...
Resize by right clicking the picture in your Word, choose "size". Type in 7.5 for the height. Click in the "width" box and the picture will auto adjust. It should be stretched out on the paper.
This will work for a quarter-fold sized card.
A letter sized paper should make two cards.
Cut out the object (the rectangle shape). Lightly shade the back with pencil (only need to shade the area where the lines are), center it (face up) on the smaller 1/2 sheet of card stock and trace over the dashes and lines.
Take off template and use an X-ACTO to cut the solid lines. When that is completed, fold on the dotted lines.
Work with the folds, to get it to lay down and open up properly when the card is viewed.
Before you glue, lay the two pieces of card stock together and adjust the folds as needed.
Glue things down, but don't glue the backs of the letters or heart. Remember to apply glue to the cut out section of the "u".
Adjust it before you give it all a good rub to set the piece in place.
Happy Valentine's Day!


No comments:
Post a Comment